MS Excel: How To Create MS Excel Named Ranges

Excel named range is defined as a range of one or more cells that contain a name. By this name, you can make formulas easier to understand and read. Named ranges in Excel also provide basic navigation by Name Box.
Excel named range is created by giving a particular name to a selecting range of cells of an Excel worksheet. Once done with defined process than the named range of Excel can be used in formulas and functions instead of using the particular cell number of the Excel worksheet.
How to Create an Excel Named Range (Quick Guide)
Create a Named Range Using the 'Define Name' Command, further steps guide available below
- Select a particular range in the Excel worksheet.
- Go to formulas and click on the Define name option.
- A New Name dialogue box will open. Now enter a good name and click on the OK button.
Advantages Of Using Named Ranges In Excel Instead of Cell Number
Excel named ranges Advantaged over Standard cell referenced of Excel worksheet:
- Giving a good or meaningful name or following the naming conventions than it’s become easier to remember the address or range of a particular cell in the worksheet.
- If you are using Named Ranges this will make the function or formula to easy understand and will throw fewer errors as compared with absolute cell numbers.
- Named ranges in Excel use absolute reference by default. That’s why Excel named ranges remain constant while copying the formula to other worksheets of Excel.
How to Create an Excel Named Range
Method 1: Create a Named Range Using the 'Define Name' Command
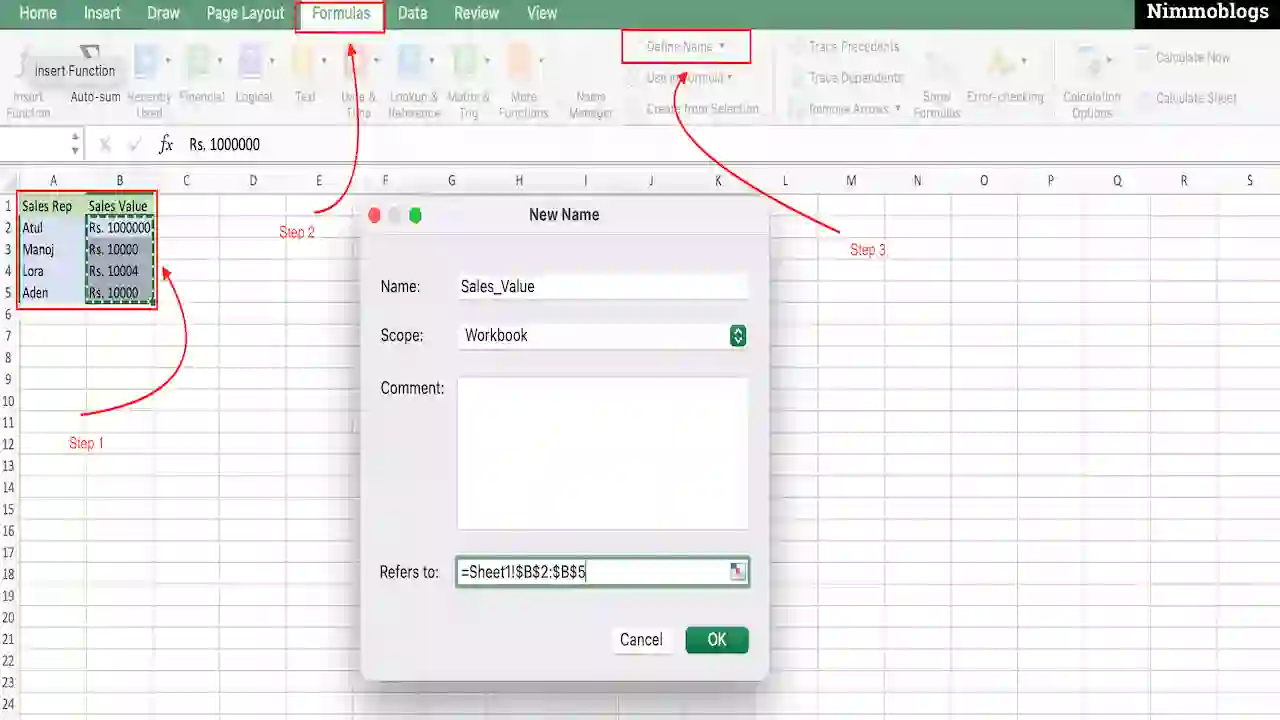
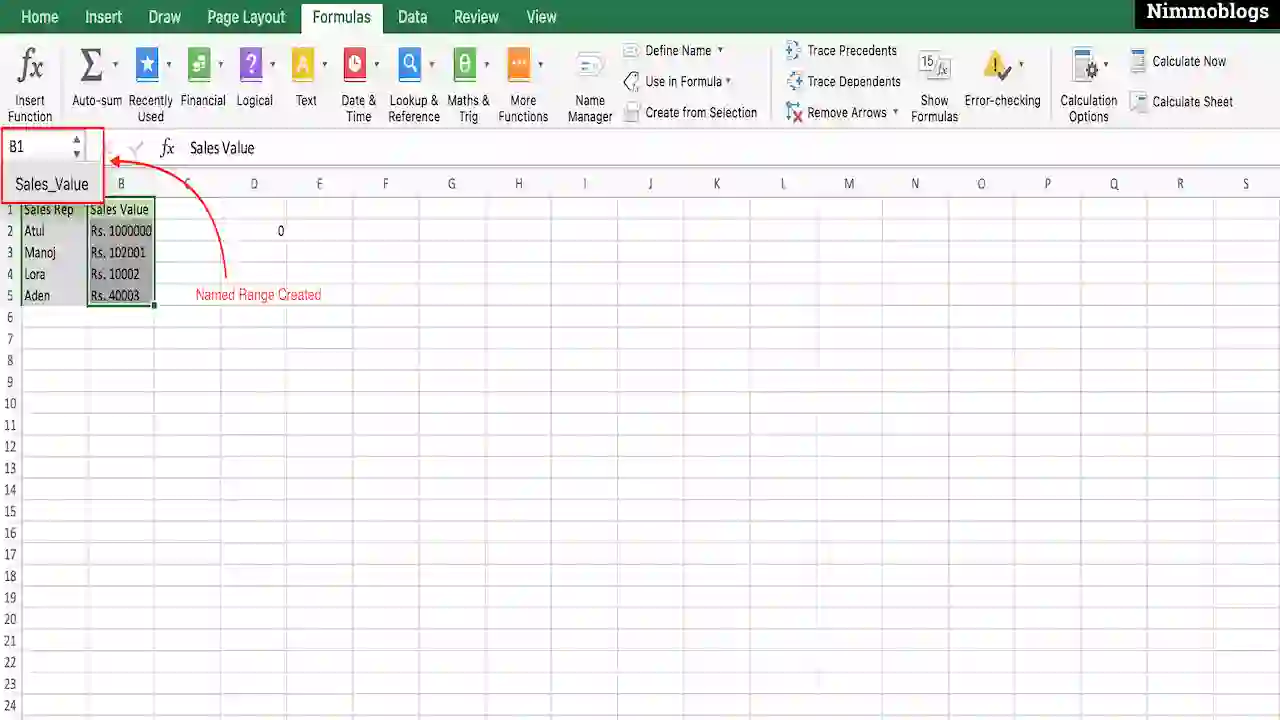
Example: Let's imagine you want to create a Named Ranges in Excel that points to the sales figure, as shown in the below image (Cells B2-B5 will refer to as a named range).
Follow the steps to create Named Ranges in Excel:
- Select a range of cells of the Excel worksheet where you want to apply named ranges.
- Now, go to the Formulas option in the options list at the top and click on the Define Name option.
- A "New Name" dialogue box will open.
- Enter a suitable name in the Name text box as here in the image Sales_value in the name will be considered by Excel as a column header (header of B1 of worksheet).
- Excel doesn’t allow space in between the text that’s why it has used the Underscore symbol in between sales and value text.
- Excel will insert a name by default but if you want to use some other name of the column then you can also enter a name of your choice. When you give a name as a header of the column then you should be aware of the following rules:
- Length of the Name should be not more than 255 characters.
- Name should start with a Letter, backslash, or an underscore.
- Including the first character of the name should include letters, numbers, periods, or underscore (no character other than this).
- Strings that are the same (as a cell reference) or single letters cannot be used as a name ("B", "E").
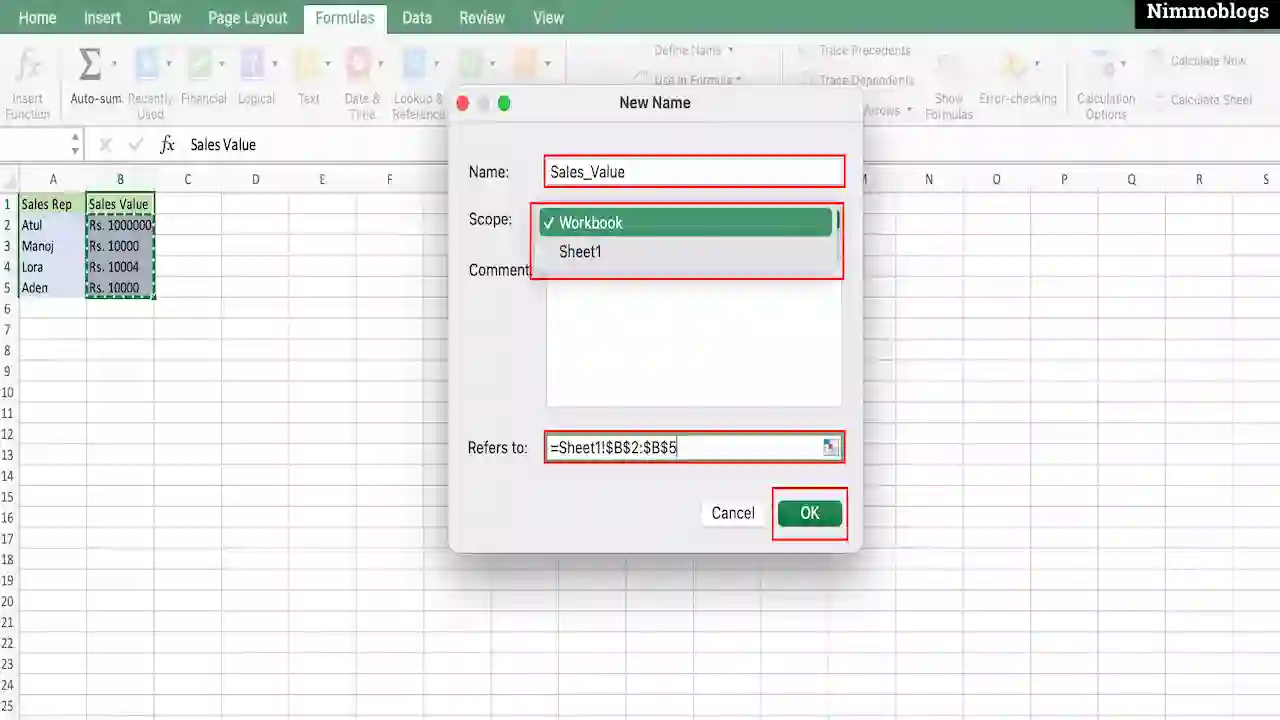
- Scope: The scope field of the New Name dialogue box refer to the Excel workbook where the new name going to be recognized in the worksheet. Users can also choose a complete workbook or can also select a single worksheet as per the requirement.
- Refers To: This cell contains information about the selected range of the cells. You can also overwrite the cell reference of the Excel worksheet.
- All the values of the New Name dialogue box are filled completely then you need to click on the OK button and now the Excel will create a New Name (Sales_value) that contains the range of cells B2 to B5.
|
- Inside the New Name dialogue box:
|
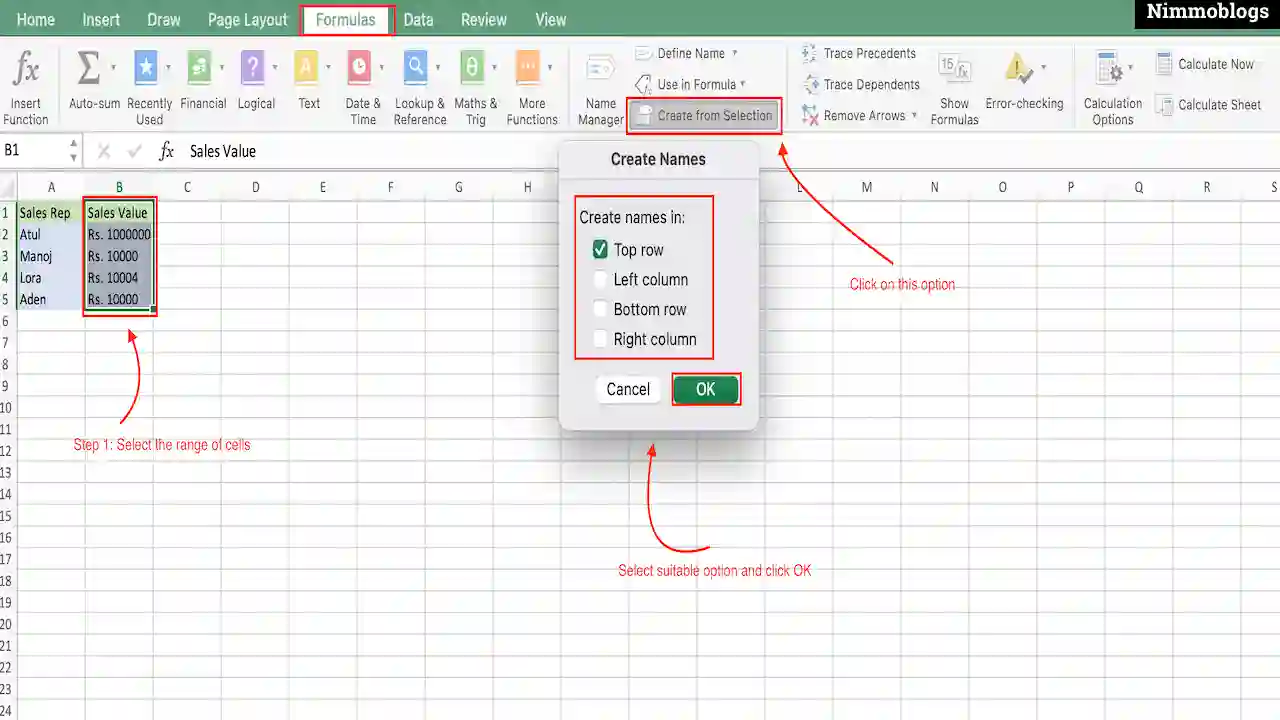
Method 2: Create a Named Range Using the 'Create from Selection' Command
Excel also provides another way to create a named range using the option "Create from Selection". This Create from Selection option allows creating a named range from a cell range containing a header or labels.
Follow the steps to continue with Create from Selection method:
- Select the range of cells including the header where you want to apply the named range.
- Now, go to the Formulas option in the options list at the top and click on the Create From Selection option.
- Now, a dialogue box will open of "Create from Selection".
- Here in the dialogue box of "Create Name from Selection" it has multiple options like the Top row, Left column, Bottom row, or Right column of the selected range for the range names.
- When you are done choosing the options from the dialogue box click on the Ok button.
- Excel does not allow to include spaces, in the mentioned example, Excel inserts an underscore and removes the space in the header Sales Value, and creates the new name as Sales_Value to refer to the range of cells B2-B5.
|
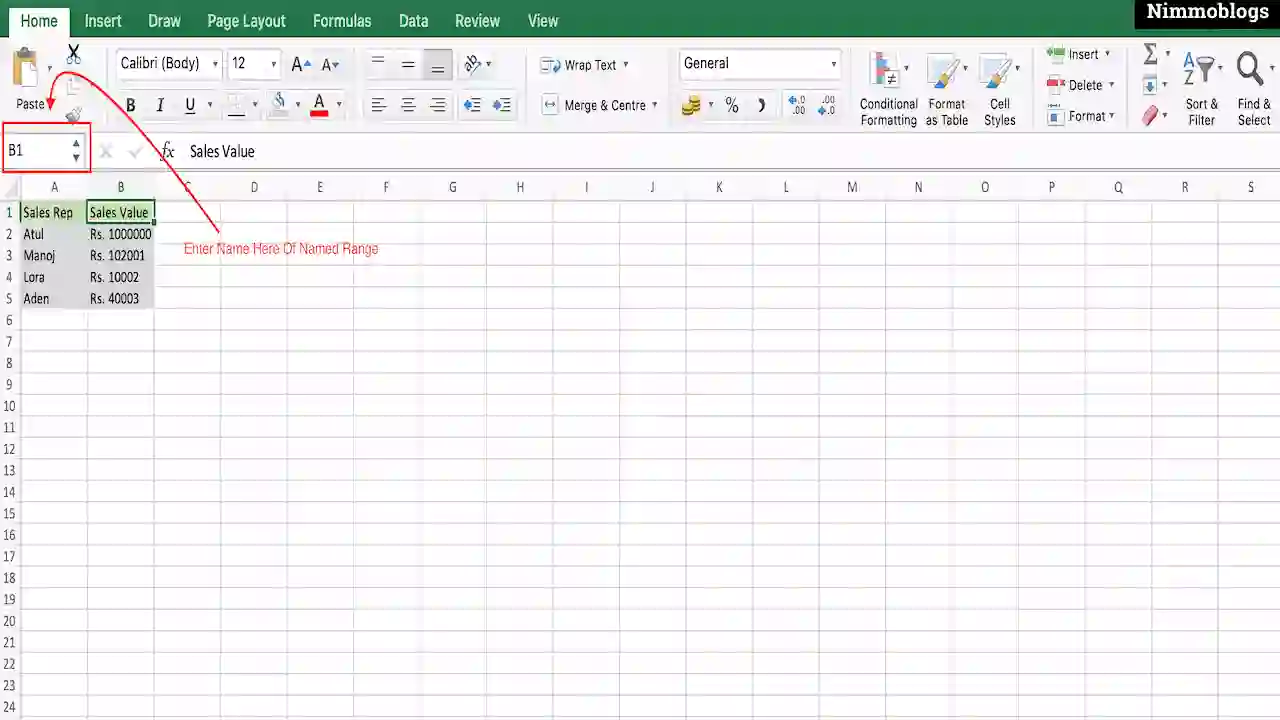
Method 3: Create A Named Range Using the Name Box
Excel named range can also be created using the Name Box method. The Name Box option is available towards the left and beside the formula bar of the Excel worksheet. Here are some steps to create a named range using the name box:
- Select a particular range of cells where you want to apply the named range in Excel.
- Go to the Name Box section and enter a suitable title or name and press the "Enter" key on the keyboard.
Excel Named Range follows some standards i.e. Name of the named range should start with a letter, backslash, or underscore character, and the rest of the characters should be period, underscore, number, or letters. No space between characters or other characters is allowed.
If a Name is used again that already contains an existing range then when you enter the same name, only the existing range got selected. Otherwise, a new named range will be created that refers to the current selection of the cells in the Excel worksheet.
|
How To Work With Excel Named Ranges
Name Box
Excel Named Range can be created by using one of the above methods. A Question will raise i.e. How to check named range is created? So, the answer to this question is, you can check that the Named range is created on or by clicking on the dropdown of the Name Box (Located at the top left beside the Formula bar).
Name Box in Excel contains the list of all named ranges that are currently defined. When you select the named range from the drop-down list of the Name Box will result in the selected range and the name of the range will appear in the Name Box.
|
Using Named Ranges In Formulas
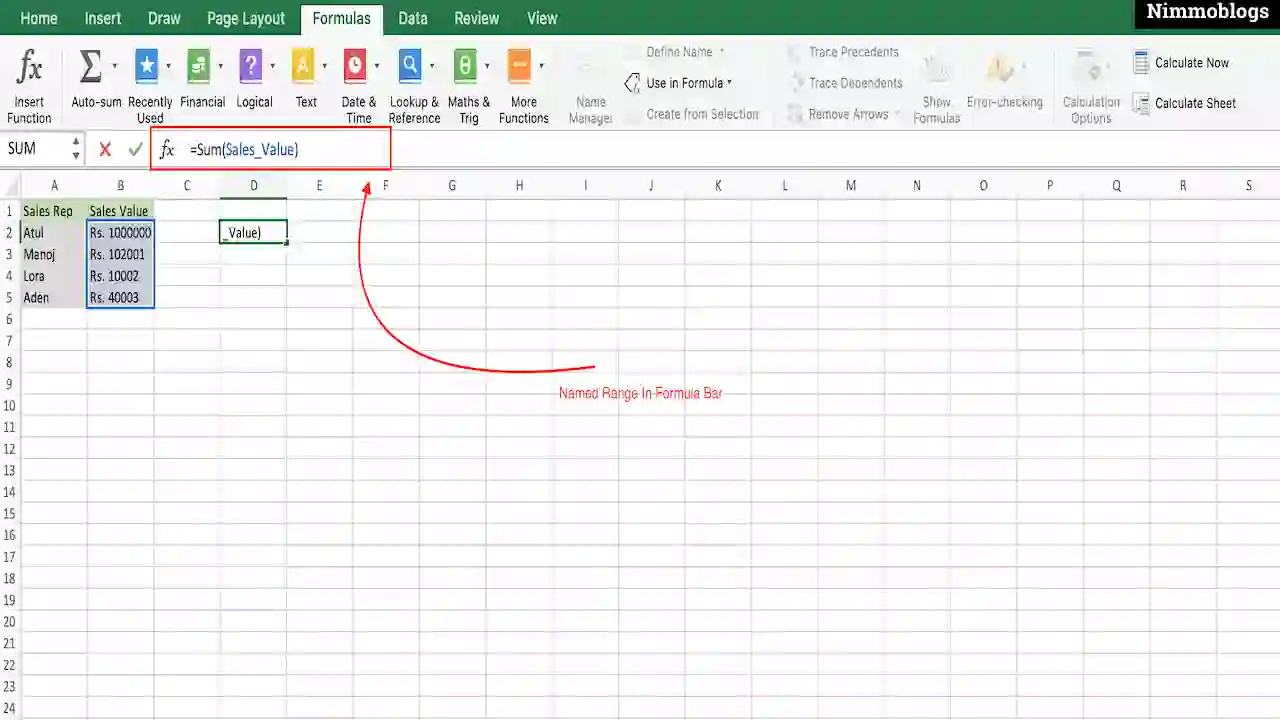
Excel Named Range can be used in Formulas instead of Cell References. Let’s see an example to explain this.
Example: Sum all the values in named range Sales_Value. There is not a big process just simply write in the formula bar =SUM(Sales_Value), this is equal to "=SUM( B2:B5 )" and the sum will be done for Sales_Value named range.
|
Named Range in Excel within formulas become easy to understand because formulas are very complex but named range can clarify the formula and prevents lots of errors
How to Edit an Excel Named Range
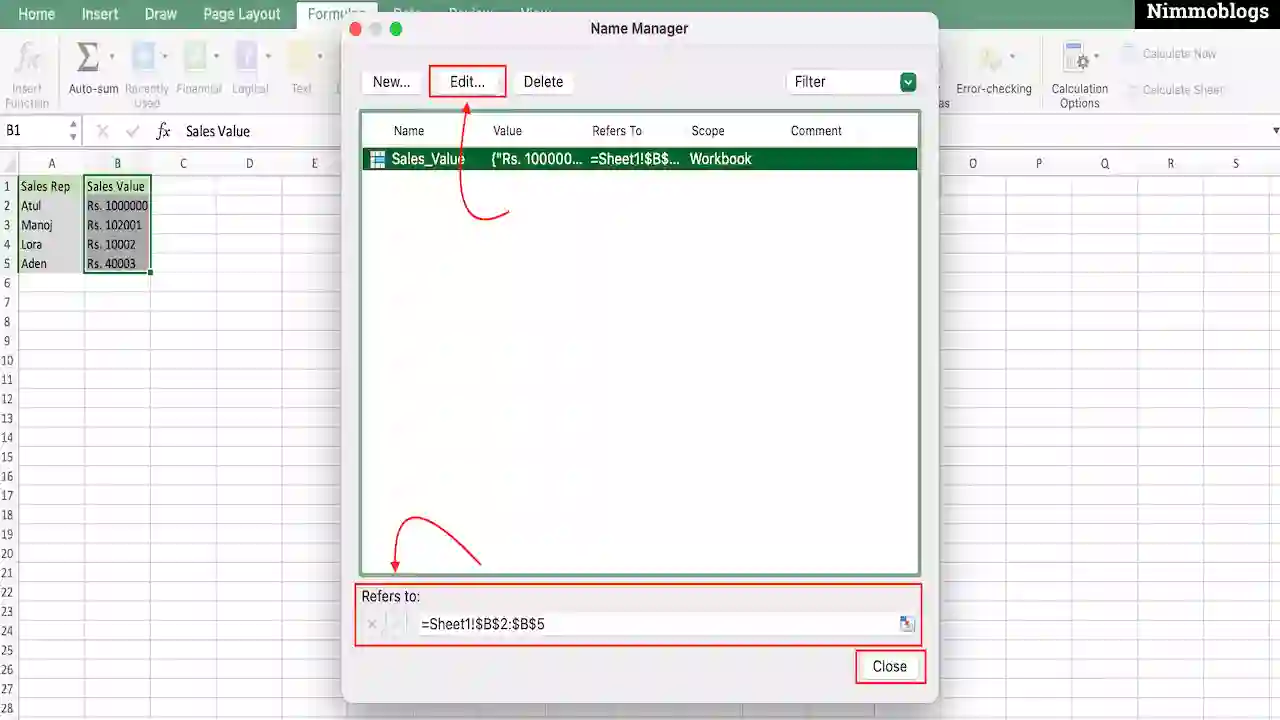
Excel named range can be modified after creating, this can be edited using the "Name Manager" option in the Excel worksheet. Simply follow the steps and do the same:
- Go to the Formulas tab and click on the Name Manager option
- Name Manager pop-up or dialogue box will open. The dialogue box contains all the named ranges you have to Choose the particular named range which you want to edit.
- Named range can be edited using Refers To field and click on the close button of the dialogue box.
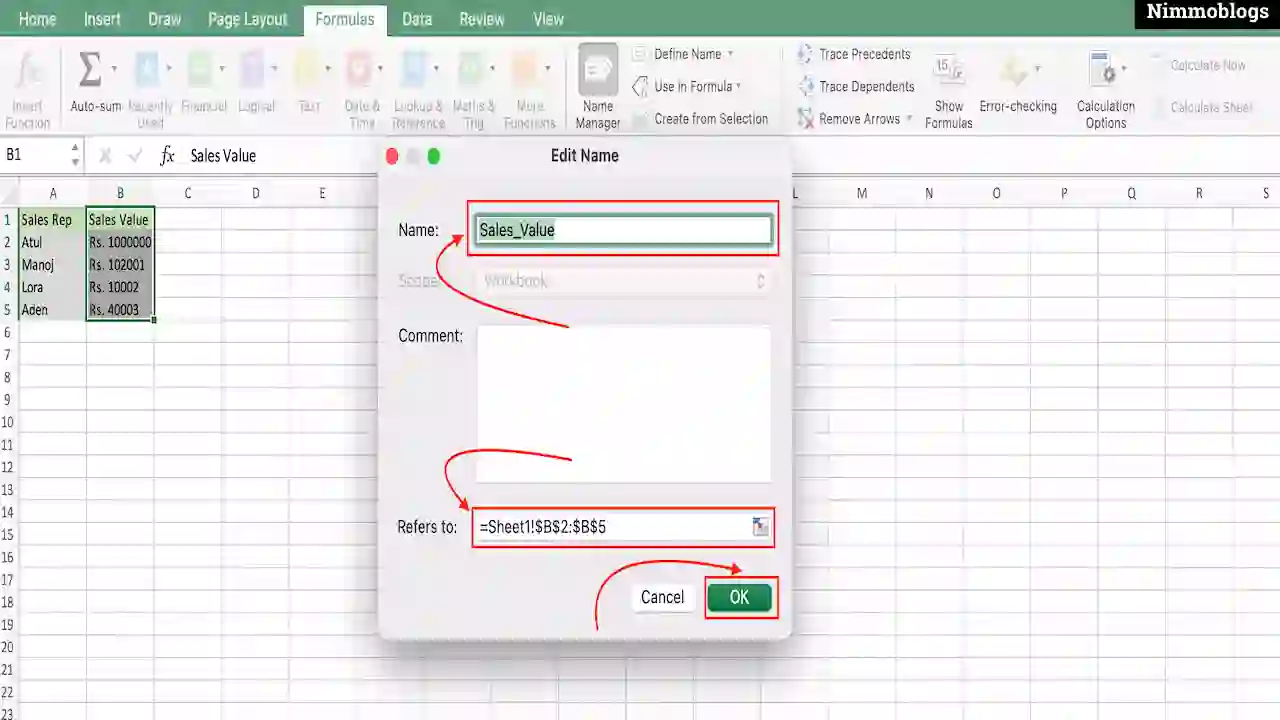
- Click on Edit button at the top of the dialogue box. A new dialogue box will be open of Edit Name.
- Edit Name dialogue box allow you to change the name of the named range or the range of cells.
|
|
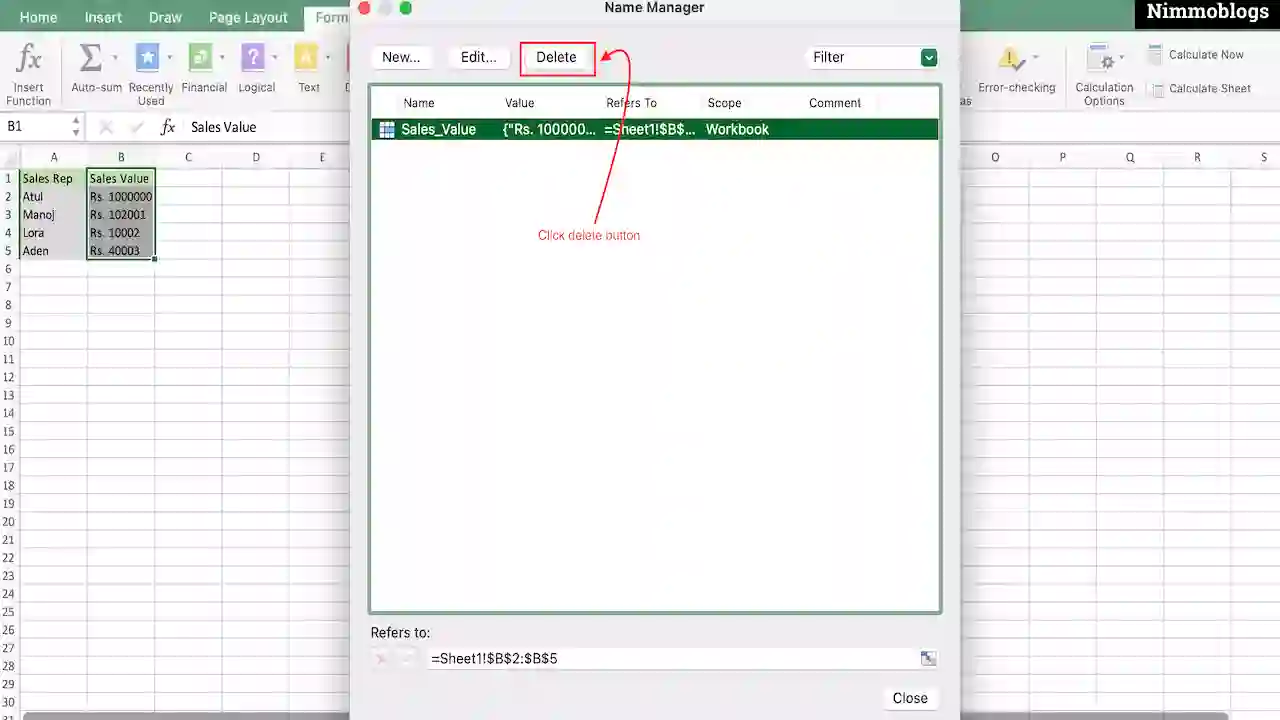
How to Delete an Excel Named Range
Excel Named range can also be deleted using the same "Name Manager" Option in the Excel worksheet. Simply follow the steps and do the same:
- Go to the Formulas tab and click on the Name Manager option
- Name Manager pop-up or dialogue box will open. The dialogue box contains all the named ranges you have to Choose the particular named range which you want to delete.
- Now, click on the Delete button to delete the particular named range in Excel.
- Confirm the delete named range and finally click on the Close button to close the dialogue box and complete the process.
|

Goal Setting: How To Set Goal In Life

Podcast: How To Cancel Spotify Premium

Podcast: Podcast That Should Listen

Podcast: What Is Google Podcast

Podcast: What Is Podcast And How Does It Works

Time Management: Good Time Management Skills

Time Management: How To Improve Time Management Skills

Top 25 Ways To Increase Productivity

Robotics: What Is Robotics And How Does It Work

Positive Thoughts: Positive Thoughts Can Change Your Life

How To Become Rich With No Money

Top 5 Ways To Become A Rich

Communication: Top 7 Ways To Communicate Effectively

Personality Development Tips For Men

Personality Development Tips For Woman
©2026 Nimmoblogs
All Right Reserved.
Made with
 by Hina Aggarwal